Christmas Blending

There’s nothing like a big holiday coming. It’s a great reason to create cards and also an awesome opportunity to put your creativity and skills to the test 🙂

In this card, I chose to do some ink blending. For some reason, I usually  choose every other technique but this. Ink blending backgrounds are one thing, but coloring an image… AND blending the ink… now that’s a killer for me!

So when I came across this cute ornament stamp, I thought a small image would be a great beginner place to start and decided to give it a go. It’s a small image, so how much blending could it be ? apparently, a lot:)

On a 140 lbs water color paper I stamped the ornament (on the smooth side) using Archival ink (as it won’t bleed when I use the colors later). I stamped the image quite a few times, to create a designer paper look. I then gathered all my distress inks (22 and counting, mind you!) and divided them into color groups. I used between 3-4 colors on each ornament (only because I had the colors, I could have blended with less). Slowly and carefully I colored the ornaments and once they were all dried I gave them the final touch using the Wink of Stella clear brush pen.
If it want’s clear enough that it was a Christmas card, I heat embossed the greeting on black card stock using white embossing powder.

New Image

The result turned quite colorful and cheery if you ask me. I’m sure it’ll brighten up someone’s day for sure 🙂

This card is part of the Simon Says Stamp! Wednesday blog challenge. Please visit the blog for some more awesome Christmas creations by some very talented artists.

Don’t forget to give thanks this Thursday. And eat light so you have strength and energy (and mostly patience)  for BLACK FRIDAY!!!!

Best,
T

Giving Thanks – In Honor of Omri David

November is the month of Thanksgiving. It’s the time of the year when you take your time to be grateful and thankful for everything in your life, especially the little things that normally pass by as granted.

This year, I’m giving thanks to good health. It’s something most of us are gifted with most days, and that’s why we should not take it for granted. A month ago, Omri David, a 4.5 year-old boy who have been battling with brain cancer for the last 10 months, surrendered to this horrible disease.  There’s not much I could say. I can’t even imagine the pain and sorrow his parents must feel. I’m sending my love, kisses, big hugs and condolences.

To honor his memory and in the hopes his family would find the strength to pick up the pieces and move on, I created this cute-childish Thanksgiving card. I’m also going to post it on Simon Says Stamp! Wednesday Challenge blog, to increase the awareness.
I used Sizzix’s Rooster die, and die cut it several times from different colors of cardstock. Once it was assembled, one look at it, and it was obvious. Yep.  The googly eyes HAD to be added :).
I wanted to leave the rooster as the main focal point of the card, so the only thing to add was a greeting. From Hero Arts Celebrate Everyday I chose the ‘Happy Thanksgiving’ and heat embossed it on a dark chocolate banner. I used champagne embossing powder to give it a bit more festivity. The card still looked somewhat empty and dull, so for the background, I decided to do my favorite background design and heat embossed a ‘happy Thanksgiving’ greeting from PTI’s Tag-its #7 Mini Stamp Set with clear embossing powder. I popped the banner and rooster up using some foam tape and adhered it all to ivory A2 note card.

IMG_5485

I’m giving thanks to a lot of things this year, especially to good health. I hope the David family will never have to experience additional pain and sorrow.

Happy Halloween!

I Know. Halloween was three days ago. But I have good excuse! I’ve been so caught up with decoration and trick or treating that I did not have time to post this.

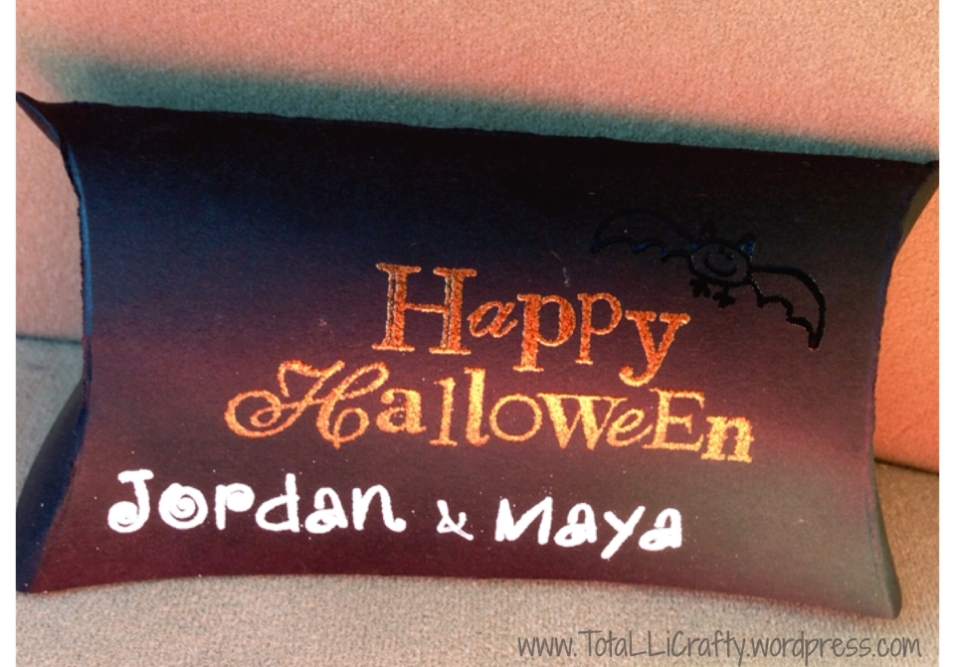
This project started a week ago. We were invited to a Halloween party at school last Friday (they’re both in preschool, where wearing customs is still allowed!) I wanted to give something to Jord and Maya’s teachers. I thought it would be fun to give them each a candy wrapped in a box. This was a wonderful opportunity to fish out my “We are memory keepers” gift box board and start making cute little boxes.
Since I needed 12 (!!!) boxes, I had to work in stages. which meant planning, which usually I suck at 🙂 but this time I made myself hold back and think of everything that needed to be done. I started with black cardstock cut to 5.5″ by 6″ I used the board to score all the boxes first. The next step was to cut the extras and punch the opening. Once these were finished the fun part began. The decorations 🙂 Again, I worked in steps. I embossed a ‘Happy Halloween’ greeting (Stampin Up!) using orange pearl embossing powder. I then embossed the bat (again. Stampin Up!) using clear embossing powder to create a black tone on tone effect. To finish the decorating (and also, so everyone would know how gave them this lovely present), I mounted “Jordan” and “Maya” (Hero Arts Fanciful Swirl Alphabet Stamp Set) on acrylic block and embossed it with SSS! white embossing powder. I did not have the “&” symbol in the stamp set (or in any other stamp set that I have), so I simply added it with my handwriting using Signo white gel pen.

The final step was to fold everything to a box and adhere it so it won’t fall a part.
This project was fun (but pretty monotone…). The teachers were excited and kept asking me where I had it done. That’s when I realized I forgot to stamp the ‘hand made’ stamp on the back LOL….

IMG_5478

Anyways, I’ll upload it all to Pinterest for those of you who like to just watch photos 🙂